How to Set Up Stolen Device Protection in iOS 17.3 and Why You Should

The latest iOS 17.3 update brings not just exciting new features like collaborative playlists and hotel AirPlay, but also a crucial shield against the rising threat of smartphone theft: Stolen Device Protection. Imagine: you’re enjoying a bustling marketplace, your phone tucked in your pocket, when suddenly, it’s gone. Panic starts to creep in; visions of compromised passwords and drained bank accounts dance before your eyes. But hold on, iOS 17.3 can offer a lifeline. Stolen Device Protection throws up a digital fortress around your iPhone, protecting your vital data even if it lands in the wrong hands.
What is Stolen Device Protection and Why Should You Care?
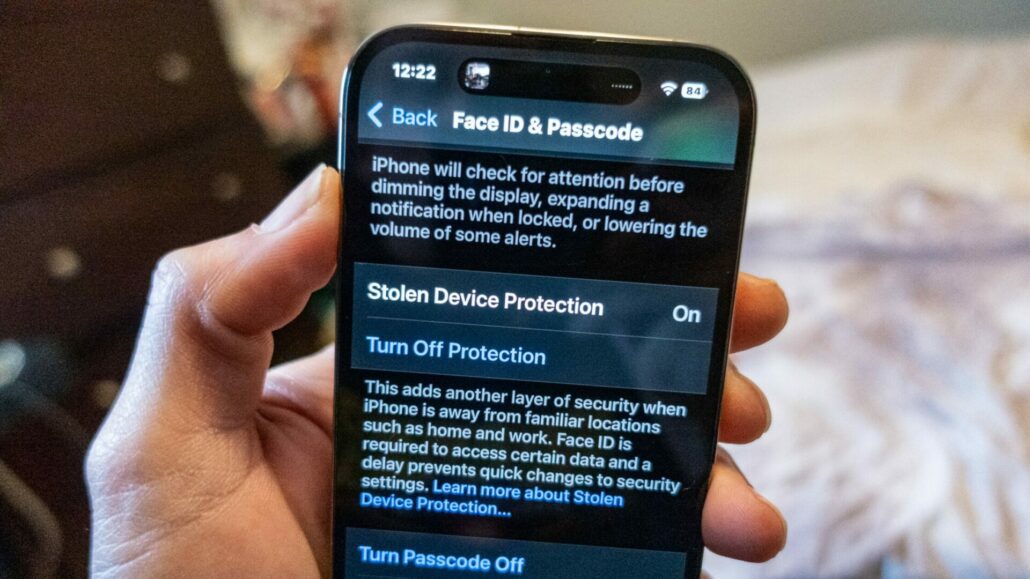
So, what exactly is this guardian angel of the digital world? Simply put, Stolen Device Protection adds an extra layer of security to your iPhone, requiring biometric authentication (Face ID or Touch ID) for accessing sensitive information and settings when you’re not in a familiar location. This means even if a nefarious actor gets their hands on your unlocked phone, they’ll be met with a brick wall when trying to access your:
- Secret vault: No peeking at passwords or passkeys saved in your iCloud Keychain!
- Financial fortress: Applying for a new Apple Card, viewing virtual card numbers, or taking certain Apple Cash and Savings actions are all locked down.
- Escape route: Turning off Lost Mode, erasing all content and settings, and setting up your iPhone on a new device become biometric checkpoints.
- Identity guard: Changing your Apple ID password, signing out of your Apple ID, and managing trusted devices and security settings require double verification.
Here are some of the things Apple said you’ll need to enter your biometric information for in order to change or access when you’re in an unfamiliar location:
- Using passwords or passkeys saved in your Keychain.
- Using payment methods saved in Safari that autofill.
- Turning off Lost Mode.
- Erasing all content and settings on your iPhone.
- Applying for a new Apple Card.
- Viewing your Apple Card’s virtual number.
- Taking certain Apple Cash and Savings actions in your Wallet, like initiating a transfer.
- Using your iPhone to set up a new device.
For actions like changing your iPhone passcode or resetting all settings, Stolen Device Protection adds a Security Delay. Imagine this: You’re back home, safe and sound, but you realize you need to change your passcode. Suddenly, you need Face ID, and then you have to wait an hour to complete the action! This extra hurdle gives you time to react if your phone isn’t actually in your familiar surroundings.
Here are some of the things Apple said are protected by Security Delay:
- Turning Stolen Device Protection off.
- Changing your Apple ID password.
- Signing out of your Apple ID.
- Updating your Apple ID account security settings, like adding or removing trusted devices.
- Adding or removing Face ID or Touch ID information.
- Changing your iPhone passcode.
- Resetting all your iPhone’s settings.
- Turning Find My off.
Remember, no security measure is foolproof. Stolen Device Protection doesn’t protect everything on your phone. For instance, Apple Pay still works with your passcode, so consider enabling other security features like strong passwords and multi-factor authentication for additional layers of defense.
And while Stolen Device Protection is the star of the show, iOS 17.3 offers other security goodies. Improved Find My features help locate lost devices with greater precision, and the optimized Crash Detection reduces false alarms, ensuring help arrives when you truly need it.
How to Enable Stolen Device Protection
Now that you know the power of Stolen Device Protection, let’s unlock its potential on your iPhone! It’s a quick and straightforward process:
- Before you begin, ensure your iPhone is updated to iOS 17.3. Head to Settings > General > Software Update and follow the on-screen prompts.
- Make sure Face ID or Touch ID is set up and functioning flawlessly. Open Settings > Face ID & Passcode (or Touch ID & Passcode) and follow the setup instructions if needed.
- Navigate to Settings > Face ID & Passcode (or Touch ID & Passcode) once again.
- Swipe down to find the Stolen Device Protection section.
- Simply tap the Turn On Protection button and let your iPhone guide you through any confirmation steps.
Convinced yet? Update your iPhone to iOS 17.3 today and activate Stolen Device Protection. It’s a simple step that could make a world of difference in a vulnerable moment. Enjoy the peace of mind that comes from knowing your digital life is secured, leaving you free to explore the exciting new features and updates that iOS 17.3 has to offer. Remember, in the online world, sometimes the best offense is a strong defense.
Tony has a bachelor’s degree from the University of Phoenix and over 14 years of writing experience between multiple publications in the tech, photography, lifestyle, and deal industries.


Leave a Reply
Want to join the discussion?Feel free to contribute!