
AI & Software · Tutorial
How to Use Docker Sandboxes: A Practical First-Day Guide
Docker Sandboxes is a free local CLI that runs Claude Code, Codex, Copilot CLI, OpenCode, Kiro, and other coding agents inside per-agent microVMs so they can install packages, modify files, and run their own Docker containers without touching your host machine. This guide walks a first-day user from picking the right install path for their platform through the canonical `sbx run claude` workflow, through the workspace modes and port publishing that matter for real projects, and through the security footguns Docker itself calls out in its own docs.
 By Tony Simons 23 min read
Disclosure: This page may contain affiliate links; I may earn a commission at no extra cost to you. It never changes the verdict. Details

Disclosure
I may earn a commission from qualifying purchases. Opinions stay independent. Full disclosure
# How to Use Docker Sandboxes: A Practical First-Day Guide to Running Coding Agents Safely
If you only need the one-line answer: Docker Sandboxes is a free local CLI (sbx) that runs Claude Code, Codex, Copilot CLI, OpenCode, Kiro, and other coding agents inside per-agent microVMs, so each agent can install packages, modify files, and run its own Docker containers without touching your host machine. On macOS you install it with brew trust docker/tap && brew install docker/tap/sbx, sign in with sbx login, then run sbx run claude from any project directory.
How to use Docker Sandboxes, concretely: pick the install path that matches your platform, run sbx login once, then use sbx run <agent> for the everyday workflow. The rest of this guide unpacks the whole arc, including the five isolation layers, the two workspace modes, port publishing, environment variables, the Git-hooks caveat Docker calls out in its own security page, and the three places Docker Sandboxes still leaks your host data.
What Docker Sandboxes Is, and Why It Wins for Agent Safety
Before you learn how to use Docker Sandboxes, it helps to know what it is and why the microVM boundary matters. Docker Sandboxes is the local CLI Docker built for running coding agents unattended. The official documentation describes it as running agents inside per-agent microVMs, each with its own Docker daemon, filesystem, and network, so the agent can build containers, install packages, and modify files without touching the host system. The product page positions it as the answer to the recurring problem of letting an agent run with --dangerously-skip-permissions (the “YOLO mode” Claude Code, Codex, and Gemini CLI all expose) without giving it free rein over your laptop.
The official product page lists the supported coding agents as Claude Code, Copilot CLI, Codex, OpenCode, and Kiro. The docs add four more: Gemini CLI, Cursor, Docker Agent, and Droid, plus a Shell template that runs no agent at all and is meant for manual setup or testing inside the sandbox. If you came from my guide to running Claude Code, Docker Sandboxes slots in as the execution layer underneath the agent itself. The agent does not change; the boundary around it does.
The January 30, 2026 Docker blog post that announced the microVM release frames Docker Sandboxes as “Level 4 Coding Agent Autonomy.” It calls out three problems developers hit when trying to solve agent isolation themselves: OS-level sandboxing is inconsistent across platforms, containers fail when the agent needs Docker itself, and full VMs are slow, manual, and hard to reuse across projects. Docker Sandboxes is Docker’s answer to all three.
Picking the Right Install Path
The install page is the source of truth, and the supported matrix is narrower than most Docker tooling because the microVM layer needs hardware virtualization. How to use Docker Sandboxes starts here: pick the install path that matches your OS before anything else.
- macOS: Sonoma 14 or later, Apple silicon. Install with
brew trust docker/tap && brew install docker/tap/sbx. - Windows: Windows 11 on a 64-bit Intel or AMD processor with the Windows Hypervisor Platform feature enabled. Install with
winget install -h Docker.sbx. - Linux: Ubuntu 24.04 or later on a 64-bit Intel, AMD, or Arm CPU, with KVM hardware virtualization supported and your user account in the
kvmgroup. Install withcurl -fsSL https://get.docker.com | sudo REPO_ONLY=1 shfollowed bysudo apt install docker-sbx, thensudo usermod -aG kvm $USERand a fresh login.
The install page explicitly notes that Docker does not test or support Docker Sandboxes on Ubuntu derivatives such as Linux Mint and Pop!_OS, because the convenience script can configure an incorrect package repository on those distributions. If you are on a non-Ubuntu Linux, the install page points to the manual install instructions in the docker/sbx-releases GitHub repository, with .deb packages for Ubuntu 24.04 and .rpm packages for Rocky Linux 8.
How to use Docker Sandboxes on macOS is a single brew tap, on Windows a winget install, and on Linux a curl script plus a KVM group. Two things matter more than the exact install command:
- You do not need Docker Desktop or Docker Engine. The install page says Docker Sandboxes works independently of both on macOS and Windows. On Linux you can either install Docker Engine alongside it with
curl -fsSL https://get.docker.com | sudo SBX=1 sh, or install only thedocker-sbxpackage with theREPO_ONLY=1script. - Linux needs KVM. If
lsmod | grep kvmreturns empty, Docker Sandboxes will not start. The install page points you tokvm-okfor diagnostics, and the 0.39.0 release notes added a more useful error message when the host cannot provide a hypervisor, including the case of a Windows install running inside a virtual machine without nested virtualization.
Once the hypervisor is happy, how to use Docker Sandboxes becomes a matter of sign-in and the daily CLI.
First Run: How to Use Docker Sandboxes to Launch an Agent
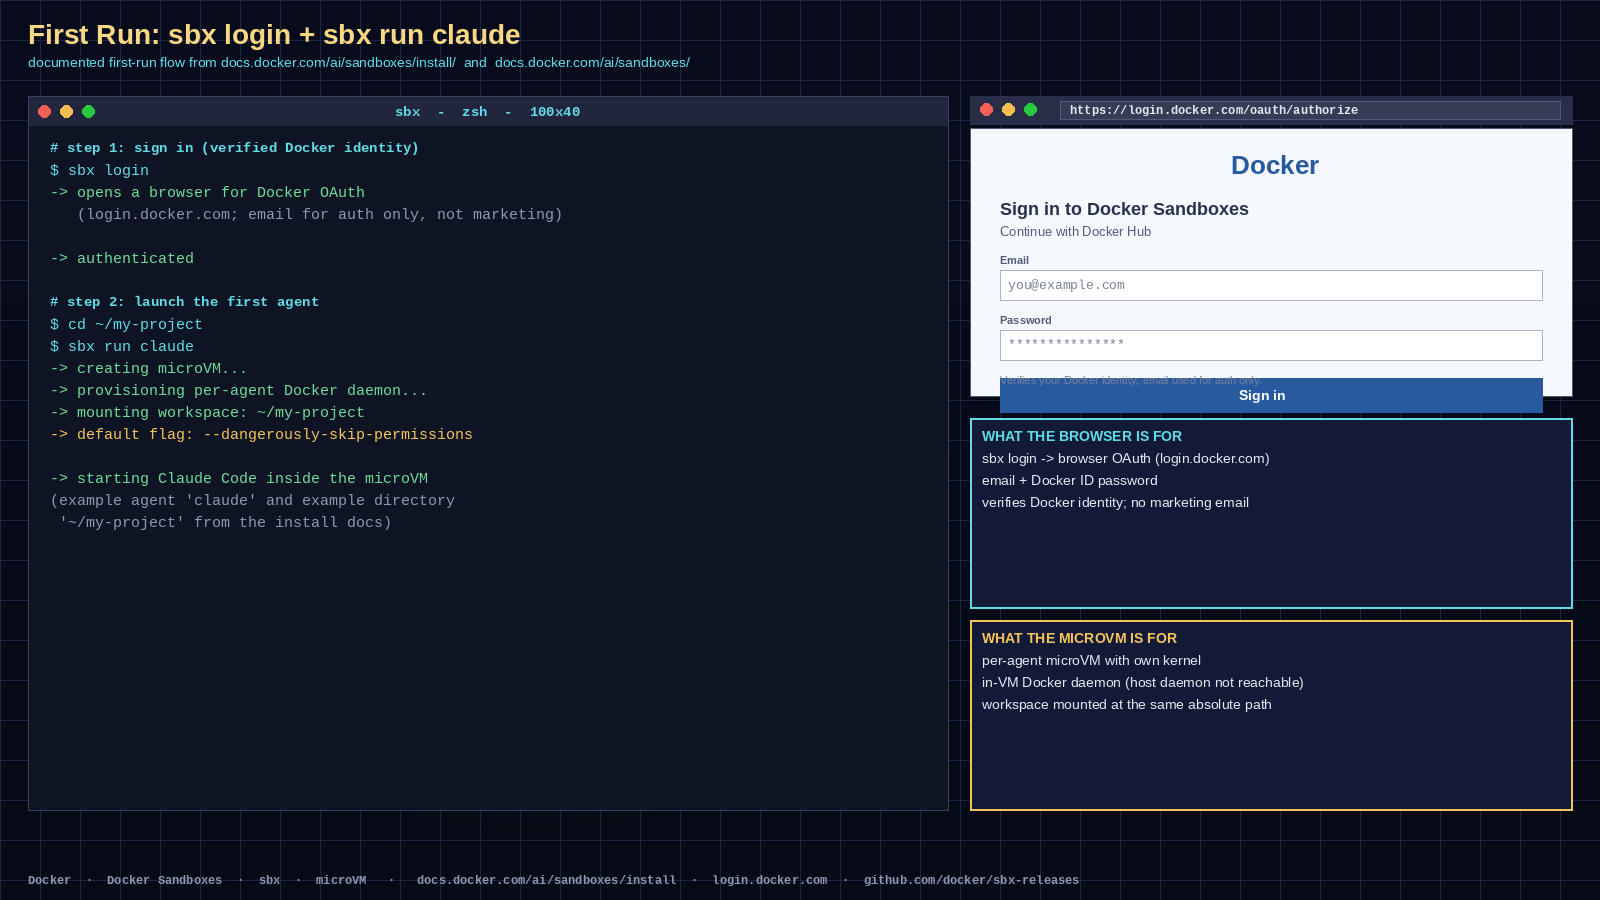
The part of how to use Docker Sandboxes that trips people up is the order: sign in first, then launch. After install, the documented first-run flow is sbx login followed by sbx run <agent>.
$ sbx loginsbx login opens a browser for Docker OAuth. The FAQ is direct about why sign-in is required: sandboxes need a verified Docker identity so the platform can tie sandboxes to a real person, enable team features, and authenticate against Docker infrastructure for image pulls, daemons, and Docker services. Your email is used for authentication only, not marketing.
After sign-in, launch any supported agent from a project directory:
$ cd ~/my-project
$ sbx run claude
That single command creates a microVM, mounts your workspace into it at the same absolute path, sets up networking through the host-side proxy, and starts the Claude Code agent inside the sandbox. The agent then runs with its default --dangerously-skip-permissions flag, and Docker handles the safety boundary in the hypervisor instead of in permission prompts. Once you see that flow, how to use Docker Sandboxes for your own projects is just sbx run <agent> from any directory.
The Day-to-Day CLI
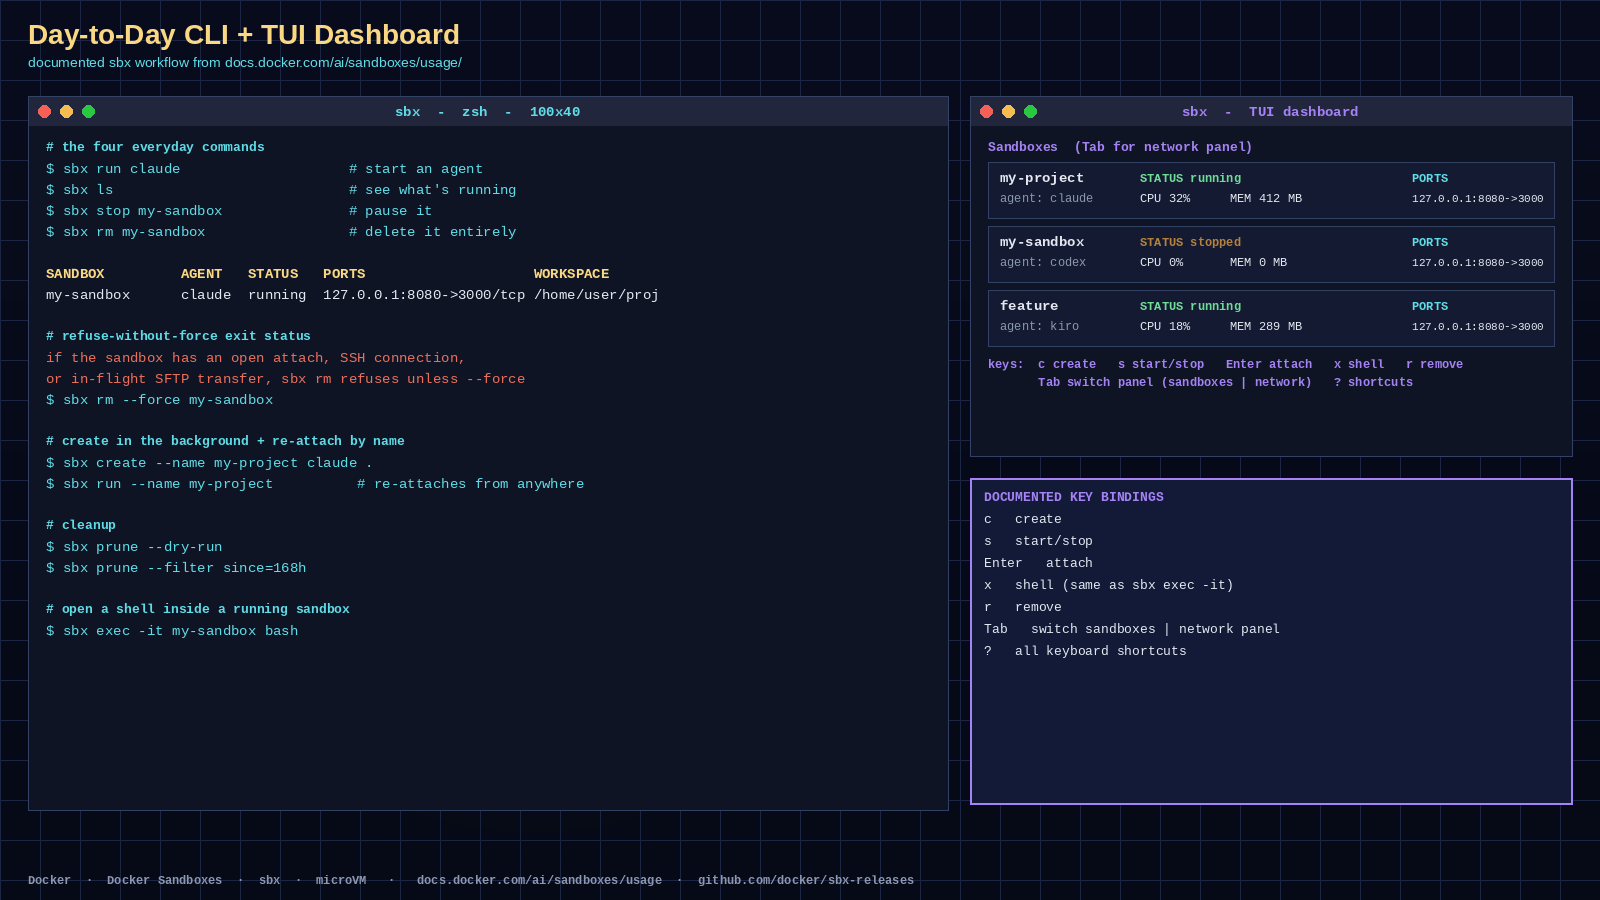
The day-to-day part of how to use Docker Sandboxes comes down to four commands you will use constantly, plus three more for slightly rarer workflows.
$ sbx run claude                    # start an agent
$ sbx ls                            # see what's running
$ sbx stop my-sandbox               # pause it
$ sbx rm my-sandbox                 # delete it entirely
sbx rm refuses unless you pass --force when the sandbox has an open attach, an SSH connection, or an in-flight SFTP transfer. If you need a clean slate, the documented pattern is sbx stop followed by sbx rm followed by sbx run again.
Sandboxes persist after the agent exits. Running the same workspace path twice re-attaches to the existing sandbox rather than creating a new one. Use --name to give a sandbox an explicit identity, and sbx run --name my-project re-attaches from any working directory, with or without the agent positional.
To remove all stopped local sandboxes at once, use sbx prune. Running sandboxes are never removed. Preview the targets with sbx prune --dry-run, or limit the cleanup to sandboxes stopped within the last week with sbx prune --filter since=168h.
sbx create is the documented escape hatch when you want the sandbox up and running without attaching to the agent session:
$ sbx create --name my-project claude .Unlike sbx run, sbx create requires an explicit workspace path. Attach later with sbx run --name my-project.
If you would rather see everything in one place, running sbx with no subcommand opens an interactive terminal dashboard with cards showing live status, CPU, and memory for each sandbox. The documented key bindings are c to create, s to start or stop, Enter to attach, x to open a shell inside the sandbox (the same as sbx exec -it), and r to remove. Tab switches between the sandboxes panel and a network governance panel where you can browse connection logs, allow or block specific hosts, and add custom network rules. Press ? for the full keyboard shortcut list.
Once those four commands click, how to use Docker Sandboxes stops feeling like a new tool and starts feeling like muscle memory.
Workspace Modes: Direct vs. Clone
When you use Docker Sandboxes for real work, the most consequential choice is the workspace mode, and Docker’s own security page flags it as a footgun. There are two modes. How to use Docker Sandboxes for any non-trivial project starts with picking one of them explicitly, because the default is the one that has the most known edge cases.
Direct mode is the default. The agent has read-write access to your working tree, and changes appear on your host immediately. The agent edits the same files you see on your host, including files that execute implicitly during normal development: Git hooks, CI configuration, IDE task configs, AI project configuration and settings, Makefile, package.json scripts, and similar build files. Docker’s security page is explicit that you need to review those changes before running any modified code, and that Git hooks live inside .git/ and do not appear in git diff output, so check them separately.
Clone mode uses --clone. The agent edits a separate Git clone inside the sandbox. Its changes stay there until you fetch them or the agent pushes them. Your host repository is also available at /run/sandbox/source, but only with read access. This is the documented safe default for any work you would not run --dangerously-skip-permissions against on your bare machine.
$ sbx run --clone claudeClone mode has four create-time constraints documented in the usage guide. It is fixed at create time: you cannot switch an existing sandbox to clone mode, you have to remove it and recreate it with sbx create --clone. The clone follows whichever ref your host repository has checked out at create time and does not create a branch automatically. The primary workspace must be a Git repository. And clone mode is rejected from inside a Git worktree other than the main one, because the read-only bind mount cannot resolve the worktree’s .git pointer file.
Port Publishing and Local Services
Sandboxes are network-isolated, which means a server running inside one is not reachable from your browser or local tools by default. The documented way to fix that is port publishing. Where how to use Docker Sandboxes differs from a bare terminal is reachability: a server inside the microVM is invisible to your browser until you publish a port.
If you know which ports you need, publish them when you create the sandbox:
$ sbx run --publish 8080:3000 --name my-sandbox claudeThe syntax 8080:3000 means publish sandbox port 3000 on host port 8080. To let the OS pick a free host port instead, specify only the sandbox port and then use sbx ports to check which host port was assigned:
$ sbx ports my-sandbox --publish 3000
$ sbx ports my-sandbox
sbx ls shows active port mappings alongside each sandbox. The format is 127.0.0.1:8080->3000/tcp, which tells you the host binding is loopback only, not all interfaces. To stop forwarding a port, use sbx ports my-sandbox --unpublish 8080:3000. When sbx run re-attaches to an existing sandbox, it ignores --publish; you have to use sbx ports to publish ports on that sandbox.
Environment Variables and Persistent Config
Starting with version 0.39.0, sbx run and sbx create accept -e and --env to set environment variables in a sandbox, and --env-file to load multiple variables from files. The flags follow docker run precedence: values passed with -e override values from environment files, and later files override earlier ones.
How to use Docker Sandboxes for environment variables is similar to plain Docker: -e for one-shot, --env-file for bulk, and /etc/sandbox-persistent.sh for values that survive across sessions in the same sandbox.
$ sbx run -e LOG_LEVEL=debug claudeSpecify a variable name without a value to copy its value from the host environment:
$ export API_URL=https://api.example.com
$ sbx run -e API_URL claude
Variables are stored with the sandbox and apply to every agent session started by sbx run against that sandbox. To set a variable for one command only, use sbx exec -e or sbx exec --env-file. To persist a variable across future sessions of an existing sandbox, append an export to /etc/sandbox-persistent.sh:
$ sbx exec -d <sandbox-name> bash -c "echo 'export INTERNAL_API_URL=https://api.example.com' >> /etc/sandbox-persistent.sh"The bash -c wrapper ensures the redirect runs inside the sandbox instead of on your host. The file is sourced when Bash starts inside the sandbox, including for interactive sessions and agents started with sbx run. A variable added to the file only takes effect for sessions and agents started afterward, so restart a running agent, or stop and start the sandbox, to pick up the new value.
For API keys and other credentials, do not use -e. The FAQ points you to sbx secret set for a supported service or the experimental sbx secret set-custom for a credential sent to known hosts, so the host-side proxy can inject the real value without exposing it to the agent.
A useful mental model for how to use Docker Sandboxes at this layer is: the CLI hands secrets to the host, the host hands them to the proxy, and the proxy injects them as headers inside the VM. The agent never sees the raw value.
Architecture: What’s Actually Happening Under the Hood
The architecture page documents four mechanics that matter for real-world use. Knowing how to use Docker Sandboxes well means understanding the four mechanics below, because every CLI flag maps back to one of them.
Workspace passthrough. Your workspace is mounted directly into the sandbox through a filesystem passthrough, at the same absolute path as on your host. The sandbox sees your actual host files, so changes in either direction are instant with no sync process involved. The architecture page warns against mounting network-attached or remote storage (network drives, SMB or NFS shares, or cloud-synced folders) as a workspace, because every file read and write goes over the network. That adds latency and slows agent performance. Virtiofs caching is enabled by default on all operating systems to reduce round-trips through the filesystem passthrough, with the documented opt-out of DOCKER_SANDBOXES_ENABLE_VIRTIOFS_CACHE=0 when creating the sandbox.
Per-sandbox state. When you create a sandbox, everything inside it persists until you remove it: Docker images and containers built or pulled by the agent, installed packages, agent state and history, and workspace changes. Each sandbox maintains its own Docker daemon state, image cache, and package installations. Multiple sandboxes do not share images or layers. The shared agent skills store is the documented exception: supported agents mount the same host-side store read-write unless you opt out when creating the sandbox. Each sandbox consumes disk space for its VM image, Docker images, container layers, and volumes, and that grows as you build images and install packages.
Proxy networking. All outbound TCP traffic from a sandbox routes through a proxy on your host. Agents use a forward proxy for HTTP and HTTPS; other TCP traffic is forwarded transparently. Both paths enforce network access policies. The forward proxy also handles credential injection. The host-side proxy makes its outbound connections using your host’s network configuration and routing, so when a destination is reachable through a direct route, traffic follows that route, and when reaching a destination requires an upstream proxy, the host-side proxy forwards the request to it. By default, both sandbox traffic and the daemon’s own traffic follow your OS system proxy. Only HTTP and HTTPS traffic can be forwarded to an upstream proxy; other TCP traffic cannot be redirected to a proxy.
MCP gateway. Supported agents connect to a single MCP gateway endpoint for the sandbox. The gateway runs on the host side of the sandbox boundary and brokers access to registered MCP servers. Registered MCP servers can be remote endpoints or local stdio servers launched on the host. Local stdio servers do not run inside the sandbox VM. If a local stdio server is packaged as an OCI image, or if you register an explicit docker command, it uses Docker on the host.
The Security Model: Five Isolation Layers
Docker’s security page describes the trust boundary as the microVM itself. The agent has full control inside the VM, including sudo access. The VM boundary prevents the agent from reaching anything on your host except what is explicitly shared. Understanding how to use Docker Sandboxes safely means understanding the five layers below, because the trust boundary is a concrete microVM, not an assumption. The five documented isolation layers are:
- Hypervisor isolation: separate kernel per sandbox, no shared memory or processes with the host.
- Network isolation: outbound TCP traffic is proxied through the host and governed by a deny-by-default policy. Direct external UDP and ICMP are blocked at the network layer, and sandboxes cannot communicate directly with each other over the network.
- Docker Engine isolation: each sandbox has its own Docker Engine with no path to the host daemon. This is what lets the agent build and run Docker containers while staying isolated from your host Docker.
- Workspace isolation: opt-in via
--clone. The agent works on a private in-VM clone and your repository is mounted read-only. The default direct mode applies no workspace boundary, which is why Docker’s security page calls out Git hooks and other implicit execution paths explicitly. - Credential isolation: API keys are injected into HTTP headers by the host-side proxy. Credential values never enter the VM.
These five layers are the practical version of the agent-safety theory in my guide to how AI agent safety testing actually works: understanding how to use Docker Sandboxes safely means internalizing them, because the trust boundary is a concrete microVM, not an assumption.
The list of what crosses the boundary into the VM is short: the workspace directory, credentials (as injected headers, never raw values), allowed network destinations, the shared agent skills store, and MCP gateway traffic. The list of what crosses the boundary back to the host is even shorter: workspace file changes, allowed outbound TCP connections, and shared skill changes. Outside the workspace and shared skills store, the agent cannot access your host filesystem, your host Docker daemon, your host network directly, or any destination not allowed by network policy.
The security page is unusually candid about what is not isolated by default. The default allowed domains include broad wildcards, and some defaults like *.googleapis.com cover many services beyond AI APIs. Run sbx policy ls to see the full list of active rules, and remove entries you do not need. Kits run install commands with root privileges inside the sandbox; to limit supply-chain risk, sbx restricts kit installs to an allowlist of sources that defaults to Docker Hub only. Shared agent skills create a narrow exception to cross-sandbox isolation: the store is mounted read-write, so one sandbox can modify instructions or scripts that an agent later uses in another sandbox. This does not expose the rest of the host filesystem or create a direct network path between sandboxes, but it does put participating sandboxes in the same trust boundary.
Local stdio MCP servers run outside the sandbox VM. If you register a local MCP server that starts a host process or host Docker container, that process or container uses host permissions and host isolation, not sandbox isolation. Treat local MCP servers as trusted host integrations.
Pricing: Free for Individuals, Paid for Org Governance
The FAQ is direct about pricing. The sbx CLI is free to use, including for commercial and professional work, with no per-seat fee. Install it, sign in with a free Docker account, and run sandboxes at no cost.
How to use Docker Sandboxes at the individual tier is straightforward: free CLI, free Docker Hub login, and no metering on number of agents, sandboxes, or builds.
The only paid component is organization governance, which covers centrally managed network, filesystem, and MCP policies, sign-in enforcement, and audit logs. Everything else, including running agents in isolated sandboxes, is free. To upgrade, contact Docker Sales for the organization governance features.
Three Footguns Docker Itself Flags
No guide on how to use Docker Sandboxes would be complete without the edges. The security and FAQ pages call out three situations where Docker Sandboxes still leaks host data or exposes you to risk.
1. Git hooks and other implicit execution paths. In direct mode, the agent edits the same files you see on your host, including Git hooks, CI configuration, IDE task configs, AI project configuration and settings, Makefile, package.json scripts, and similar build files. Git hooks live inside .git/ and do not appear in git diff output, so check them separately. The fix is either clone mode or disciplined review of every changed file including the ones git diff does not show.
2. The clipboard image paste opt-in. Pasting an image or screenshot with Ctrl+V is different from text paste: the agent reads it from your host clipboard, and the sandbox blocks that access unless you opt in. Turn it on with sbx settings set clipboard.imagePaste true. The FAQ notes this is opt-in because it relaxes the sandbox’s isolation: when enabled, a process inside the sandbox can read your host clipboard through the host-side proxy. The exposure is narrow (reads happen only on a paste, return image data only as image/png, and clipboard content is never cached or logged), but it is still host data crossing into the sandbox, so it stays off until you turn it on.
3. The shared agent skills store. Imported skills persist after sandbox deletion and are mounted into new sandboxes for supported agents. The store is mounted read-write by default, so one sandbox can modify instructions or scripts that an agent later uses in another sandbox. The FAQ recommends running sbx skills import to copy skills from supported host directories into the persistent store, and passing --no-share-skills to sbx run or sbx create to opt out per sandbox. Treat participating sandboxes as the same trust boundary, because they are.
Behind a Corporate Firewall
If your organization restricts outbound network access with a firewall or proxy, the FAQ documents nine domains that need to be allowlisted for sbx to authenticate, pull images, and report diagnostics. Knowing how to use Docker Sandboxes inside a locked-down network means making sure these nine domains are reachable before anything else, or sign-in and image pulls will silently fail. The full list is login.docker.com, hub.docker.com, api.docker.com, marlin-2.docker.com, marlin-api.docker.com, registry-1.docker.io, auth.docker.io, dhi.io, and sbx-diagnostics.s3.us-east-1.amazonaws.com. If any of those are blocked, sign-in, image pulls, and telemetry uploads will fail in ways that look like bugs but are actually the firewall.
Telemetry and Secrets Storage
The CLI collects basic usage data: which command you ran, whether it succeeded or failed, how long it took, and, if you are signed in, your Docker username. Docker Sandboxes does not monitor sessions, read your prompts, or access your code. To opt out of all analytics, set SBX_NO_TELEMETRY=1 in your shell environment.
How to use Docker Sandboxes without sending any telemetry: export SBX_NO_TELEMETRY=1 before you run sbx login, and the CLI will skip all analytics calls from that point forward.
On Linux, sbx stores secrets in the Secret Service exposed by your desktop keyring (GNOME Keyring or KDE Wallet). On headless servers and some WSL setups with no Secret Service, it falls back to a file under $XDG_CONFIG_HOME/com.docker.sandboxes, which defaults to ~/.config/com.docker.sandboxes. The fallback file gets 0700 permissions, the same file-permission model used for ~/.docker/config.json. Any user or process that can read the file can retrieve the stored credentials, so treat the directory as sensitive. Where available, prefer a keychain, which mediates access per application.
What’s New and What’s Next
The 0.39.0 release shipped on 2026-08-19 and added declarative sandbox environments in .sbxenv.yaml with sbx env run, sbx env create, sbx env exec, and sbx env rm. This feature is experimental. The same release added the -e/--env and --env-file flags and an experimental --usb flag behind DOCKER_SANDBOXES_FEATURE_SANDBOX_USB for re-attaching specified USB devices on Linux x86_64 and ARM64.
How to use Docker Sandboxes is moving toward declarative config: .sbxenv.yaml files capture the same flags you would otherwise pass to sbx run, which makes sandbox configurations reproducible across teammates and CI runs.
The 0.38.0 release shipped on 2026-08-06 and introduced kit spec v2 with schemaVersion: "2" for new kits, made MCP management a first-class feature with sbx mcp and a built-in MCP gateway, and added sbx setup ssh for managing SSH connections to sandboxes via a *.sbx SSH config entry.
The Docker blog’s “What’s Next” list for the microVM release tracks the same themes: Linux support (now shipped), MCP Gateway support (now shipped), the ability to expose ports to the host device and access host-exposed services (now shipped), and support for additional coding agents (Cursor, Docker Agent, and Droid are the three that landed).
When Docker Sandboxes Is the Wrong Tool
Docker Sandboxes is the right tool when you want a coding agent to run unattended with full autonomy inside a real development environment, and when you are willing to install a hypervisor-based CLI on macOS, Windows, or Ubuntu. Knowing how to use Docker Sandboxes also means knowing when not to reach for it, and the boundary is sharper than people expect.
It is the wrong tool when:
- You only need occasional prompts and approval prompts do not bother you. The whole point of Docker Sandboxes is YOLO mode with a hypervisor boundary, and you pay that complexity tax every time.
- You want a lightweight container sandbox with no Docker access. The usage guide’s own comparison table points you at plain container socket mounts for that case.
- You are on an unsupported platform. Linux Mint, Pop!_OS, Windows 10, or older macOS are not in the support matrix. If you cannot meet the platform requirements, the
docker/sbx-releasesrepository has manual install artifacts, but you are off the tested path. - You need Docker-in-Docker for CI pipelines. The architecture page points you at the standard
dockerDocker Hub image for that, with the documented caveat that it is partial isolation via a privileged nested daemon.
Frequently Asked Questions
These are the questions people actually type when they are learning how to use Docker Sandboxes, pulled from the sharp edges of setup and daily use. The answers below come from the same docs and FAQ pages as the rest of this guide, and they are the issues that come up most often in practice.
Can I run Docker Sandboxes on a Mac with an Intel processor?
No. The install page restricts macOS support to Apple silicon (Sonoma 14 or later).
Do I need Docker Desktop installed?
No. The install page says Docker Sandboxes works independently of Docker Desktop and Docker Engine on macOS and Windows.
Does the agent have internet access inside the sandbox?
By default, outbound TCP traffic is allowed through the host-side proxy subject to network policy. UDP and ICMP are blocked. Specific destinations can be allowed or blocked with sbx policy or the network panel in the sbx dashboard.
Can the agent read my SSH keys?
The shared agent skills store is mounted read-write by default for supported agents. Beyond that, the agent cannot access your host filesystem outside the workspace and the shared skills store. To keep host-level SSH keys out of the sandbox, do not import them as a shared skill and keep them in ~/.ssh/ on the host.
What happens if the agent breaks something?
Sandboxes are disposable. The documented recovery pattern is sbx stop <name> followed by sbx rm <name> followed by sbx run <agent> to start fresh. Installed packages, Docker images, and other VM state persist across stops and restarts but are deleted when the sandbox is removed.
Does this work with self-hosted LLMs?
Yes. sbx run --model accepts an Ollama backend via --provider ollama, a flag added in 0.39.0 that replaced the older ollama/ model-name prefix.
Is there a Windows or Linux GUI?
No. The interactive dashboard is a terminal UI run by typing sbx with no subcommand. For remote development, sbx setup ssh adds a *.sbx SSH config entry that works with VS Code, Cursor, Claude Desktop, and ChatGPT’s remote development tools.
Where do I report bugs?
The docker/sbx-releases GitHub repository has the issue tracker. The release notes also document that sbx diagnose now reports free disk space on the volume holding sandbox data and checks host virtualization support, which is the first thing to run before opening an issue.
That is the full arc of how to use Docker Sandboxes, from picking an install path to running your agent inside a microVM every day.
Reviewed & written by
Tony Simons
Tony has a bachelor's degree from the University of Phoenix and over 14 years of writing experience between multiple publications in the tech, photography, lifestyle, and deal industries.


