
AI & Software · Tutorial
How to Use Hugging Face: The Practical Starter Guide
Learn how to use Hugging Face from your first account through models, datasets, Spaces, and Inference Providers, grounded in Hugging Face's official docs.
 By Tony Simons 12 min read
Disclosure: This page may contain affiliate links; I may earn a commission at no extra cost to you. It never changes the verdict. Details

Disclosure
I may earn a commission from qualifying purchases. Opinions stay independent. Full disclosure
Learning how to use Hugging Face gets easier when you stop treating it like a model zoo. The Hub is GitHub for machine learning: models, datasets, and Spaces live in repositories with files, commits, visibility settings, tokens, and SDKs.
That one mental model explains the whole workflow. The short version of how to use Hugging Face is: create an account, authenticate, create a repository, upload an artifact, deploy a demo, or call a model. The surface changes. The underlying job stays familiar.
This guide covers the practical path from a first account to a model or dataset upload, a Space, and an inference call. It’s grounded in Hugging Face’s official documentation and help pages, checked August 2026. Vendor-published details are labeled as such, and pricing needs another check before publication.
How to Use Hugging Face: Start with the Account and a Token
A free account is enough to get started. If you’re learning how to use Hugging Face, make the paid-plan decision when you need Gradio or Docker Spaces running on compute, higher storage, higher limits, or the other features Hugging Face includes with PRO.
Hugging Face’s PRO page lists a $9 monthly price, 1 TB of private storage, up to 10 TB of public storage, and 20 times more monthly inference usage than the free tier. Those are vendor-published figures, and they can change. Treat them as a snapshot from the August 2026 documentation check, not a permanent price sheet.
Authentication has two useful paths:
hf auth loginis the interactive route. It opens a browser flow, asks you to enter a short code, and saves the token inHF_HOME, which defaults to~/.cache/huggingface/token.HF_TOKENis the environment-variable route. It’s useful in a Space or another environment where a token should come from a secret instead of a local cache. When it’s set, it takes priority over the stored token.
Both paths use a User Access Token from Settings > Tokens. A read token is for reading. A write token is required to create a repository or push content to the Hub.
That scope choice is worth making deliberately. Hugging Face recommends using a write token when you need to write and a read token when you only need to pull files or private repositories. Smaller permissions mean less damage if a token leaks.
Pick Your Client
Install the huggingface_hub Python library with:
pip install --upgrade huggingface_hubThe package also includes the hf CLI, so you can work from a terminal without adding a separate client.
The next decision in how to use Hugging Face comes down to where the rest of the work already lives:
hfCLI for terminal workflows and repeatable shell commands.huggingface_hubPython library for notebooks, scripts, and application code.- Raw
gitwhen you want to work with the repository directly. Hub model repositories are Git-based, which is why versioning, branches, sharing, and library integrations fit together.
There is no prize for picking the most complicated path. Use the CLI when the task is a terminal task. Use Python when the Hub call belongs inside Python. Reach for Git when repository-level control is the actual problem.
Create a Repository
A repository is the unit that holds the artifact. For how to use Hugging Face in a project, the Python path starts with HfApi:
from huggingface_hub import HfApi
api = HfApi()
api.create_repo(repo_id="your-username/your-repo-name", private=True)
The private=True argument creates a private repository. Leave it out when the repository should be public.
The same write boundary applies here as everywhere else in the write workflow: creating a repository or pushing content requires a User Access Token with write permission.
Set the visibility before you start uploading. A repository full of weights or data is a bad place to discover that the token or access choice was wrong.
Upload a Model
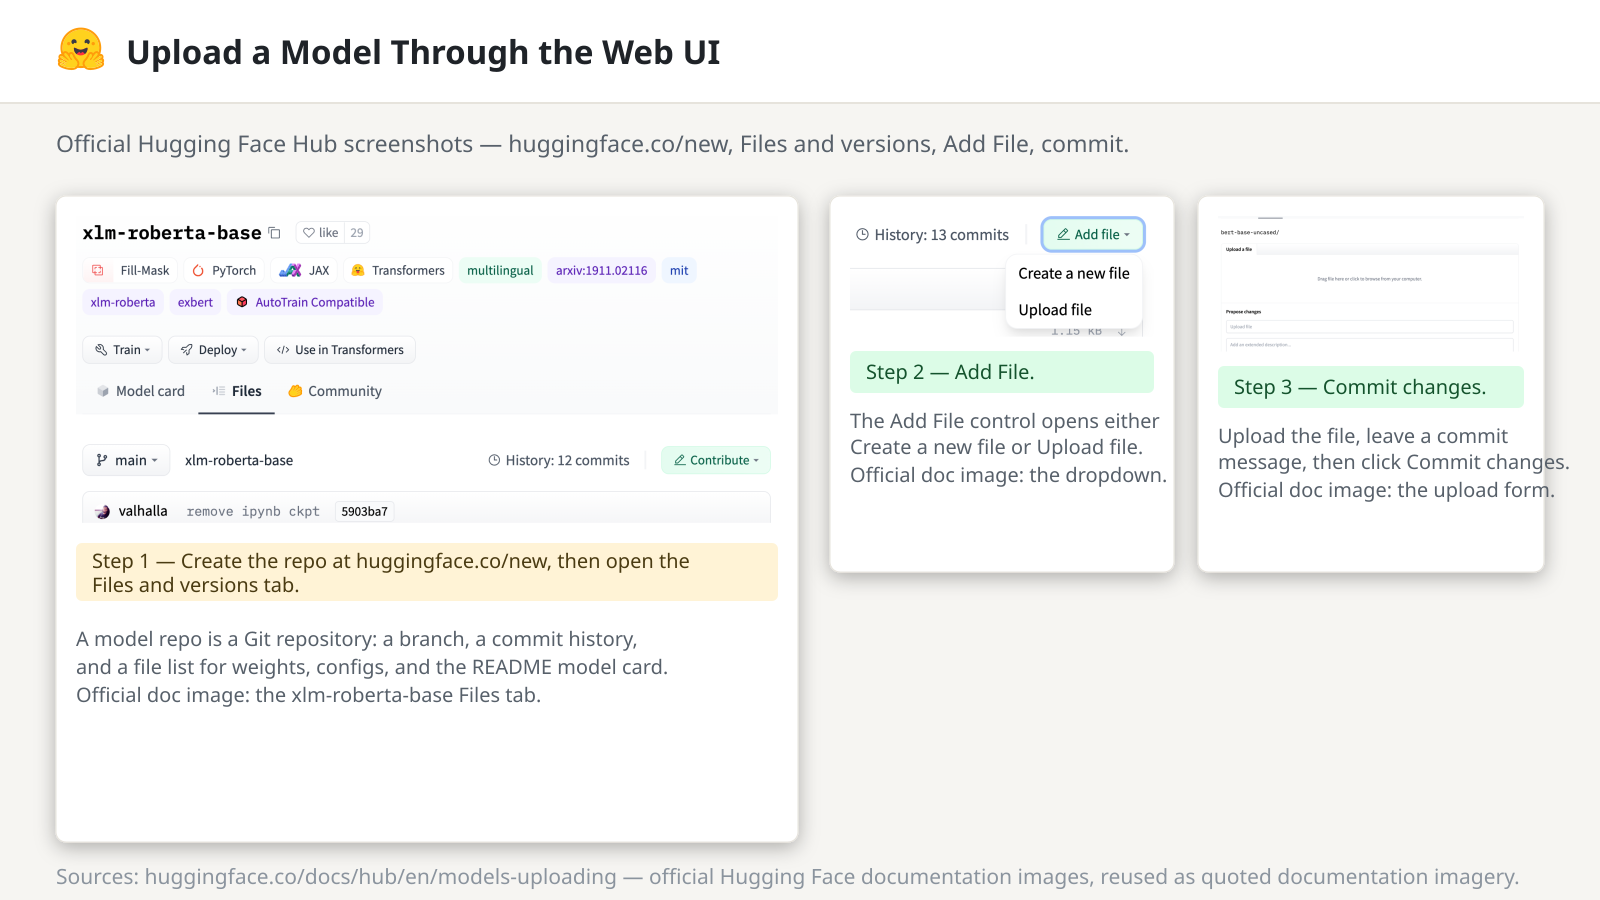
Models on the Hub are Git-based repositories. That gives them versioning, branches, discoverability, sharing features, and integration with the libraries that load them. The model-upload part of how to use Hugging Face is mostly a choice between the web UI, a library method, and Git.
The web flow is the simplest route for a one-off upload:
- Visit
huggingface.co/new. - Create the model repository.
- Open the Files and versions tab.
- Choose Add File, select a file, write a useful commit message, and choose Commit changes.
For a model already living in Transformers, Diffusers, Timm, or another library with Hub support, use the library’s Hub methods. The important calls are push_to_hub("namespace/name") to upload and from_pretrained("namespace/name") to load the model later.
Custom PyTorch models have a documented path too. PyTorchModelHubMixin from huggingface_hub adds from_pretrained and push_to_hub capabilities to an nn.Module, along with automated download metrics.
Because the repository is Git-based, the Git CLI is also a valid upload path. That’s useful when the model already belongs in a repository workflow and you need Git’s normal version-control operations.
The practical choice is simple: web UI for one file, a library method for a model object, and Git when the repository is the thing you need to control.
Upload a Dataset
Datasets use the same Hub pattern, with one file-size trap worth remembering. The dataset side of how to use Hugging Face starts with text extensions such as .csv, .json, .jsonl, and .txt, which are not tracked by Git LFS by default. Files larger than 10 MB won’t be committed and uploaded unless you compress them first, such as with .zip or .gz.
The web UI flow is straightforward:
- Open your profile and choose New Dataset.
- Pick a name and choose public or private visibility.
- Open Files and versions.
- Select Add file and upload the dataset files.
Hugging Face lists extensions including .csv, .mp3, and .jpg in the upload documentation. The compression rule applies to the text formats above, so check the file type before blaming the upload command.
For the Python path, install huggingface_hub, authenticate, and call push_to_hub("namespace/name") on a Dataset object. Set private=True when creating the repository if the first version should stay private.
Once a dataset is stored on the Hub, it can be loaded with load_dataset("namespace/name") from the datasets library. That’s the useful split: push_to_hub handles the write side, and load_dataset handles the read side.
Build a Demo with Spaces
Spaces are the Hub’s surface for deployable machine-learning demos. If how to use Hugging Face means shipping a demo, create one from the Spaces main page by choosing Create new Space.
There are three SDK choices:
- Gradio for an interactive Python demo.
- Docker when the app needs a custom container.
- Static HTML for a static site or client-side experience.
Static Spaces are free. Gradio and Docker Spaces run on compute and require a paid plan to create, with PRO for personal accounts and Team or Enterprise for organizations. Free personal accounts in good standing can still host up to two Gradio Spaces on ZeroGPU.
Spaces have three visibility levels:
- Public means anyone can view the source code, access the running app, and clone the repository.
- Protected keeps the source code private on the Hub while leaving the running app publicly accessible through its embed URL. Protected visibility is part of PRO or Team and Enterprise plans.
- Private keeps the Space private and returns a 404 when another user visits its URL.
The default CPU Basic environment has 16 GB of RAM, two CPU cores, and 50 GB of non-persistent disk. Hugging Face lists that default hardware with no hourly cost. The disk number is the part people tend to remember incorrectly: it’s not persistent storage.
Secrets, Variables, and the Built-in Environment
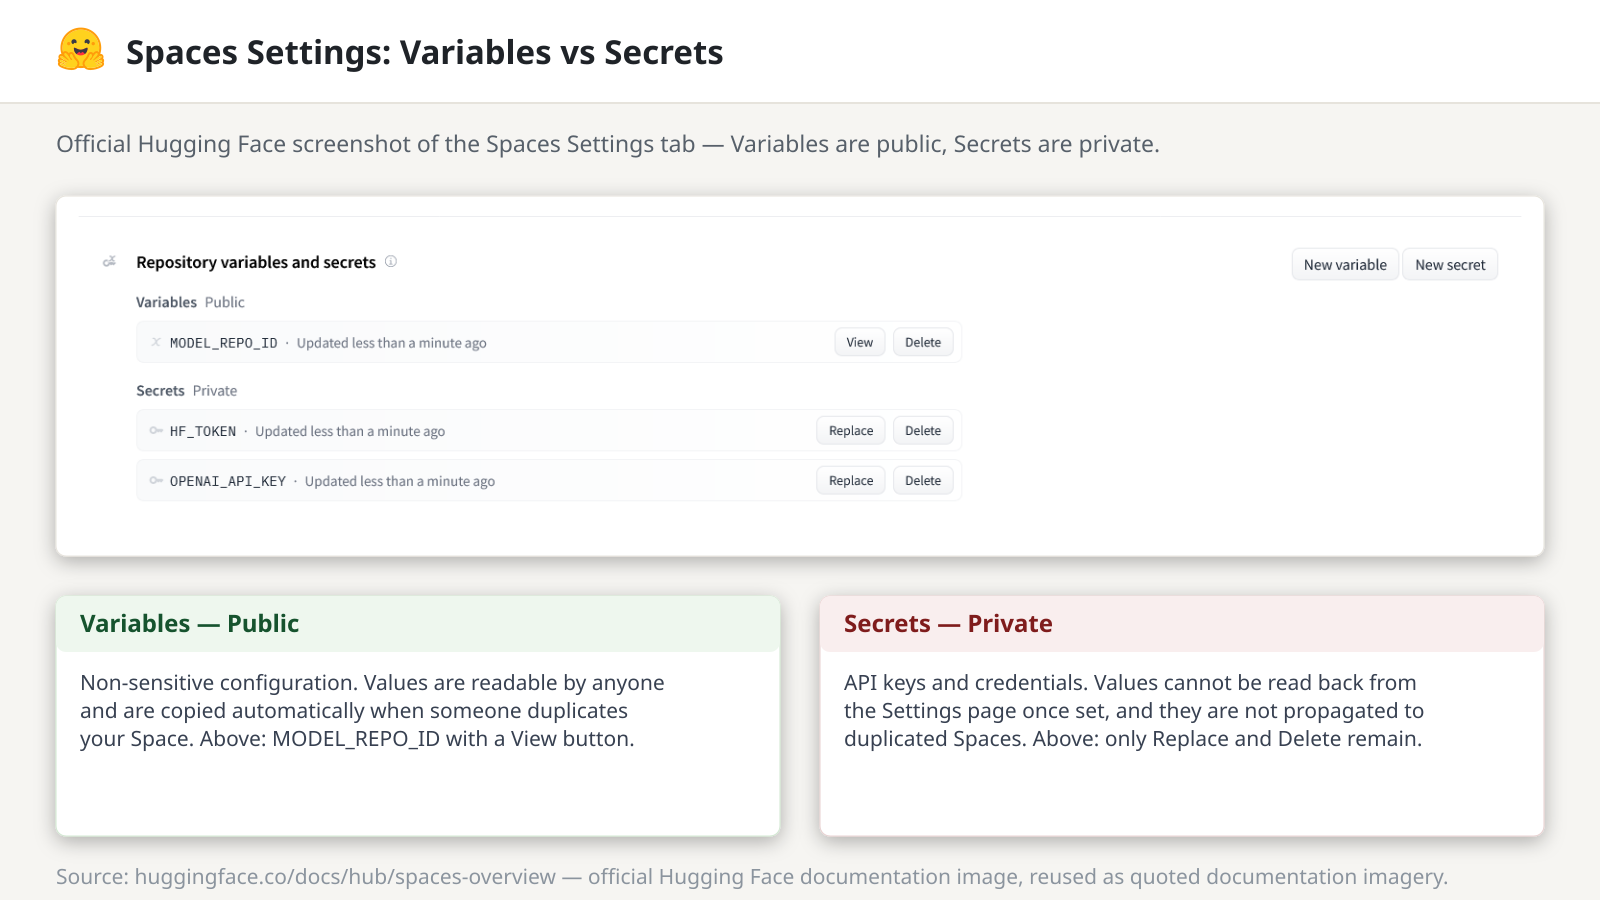
Use Variables for non-sensitive configuration. Variables are publicly accessible and are automatically added when somebody duplicates the Space.
Use Secrets for access tokens, API keys, and other sensitive values. Secret values can’t be read from the Space’s settings page after they are set, and they aren’t added to duplicated Spaces.
Both appear to the app as environment variables. A few built-in values are useful when the app needs to identify its runtime:
SPACE_IDidentifies thenamespace/nameof the Space.SPACE_AUTHOR_NAMEidentifies the owning namespace.SPACE_REPO_NAMEidentifies the repository name.SPACE_HOSTidentifies the public Space hostname.ACCELERATOR,CPU_CORES, andMEMORYdescribe the runtime.
The rule is boring and important: API keys belong in Secrets, not in the repository files. The same pattern shows up at workflow scale, where least-privilege tokens and secret handoff move through longer pipelines; see automating agent workflows with Hermes Agent for the broader pattern.
Storage and Volumes
A Space’s local disk is ephemeral. Its contents can be lost when the Space restarts or stops. Storage Buckets are the recommended way to persist data.
An attached Storage Bucket is mounted inside the Space container at a path you choose. Its contents are available as local files at runtime, and the bucket can be mounted read-write, which is the default, or read-only.
Models, datasets, and other Spaces can also be attached as volumes through the huggingface_hub Python API. Repository volumes are always read-only. If a volume points at a private repository, other users see the mount path and access mode while the source is masked with a private label.
Run Inference with Inference Providers
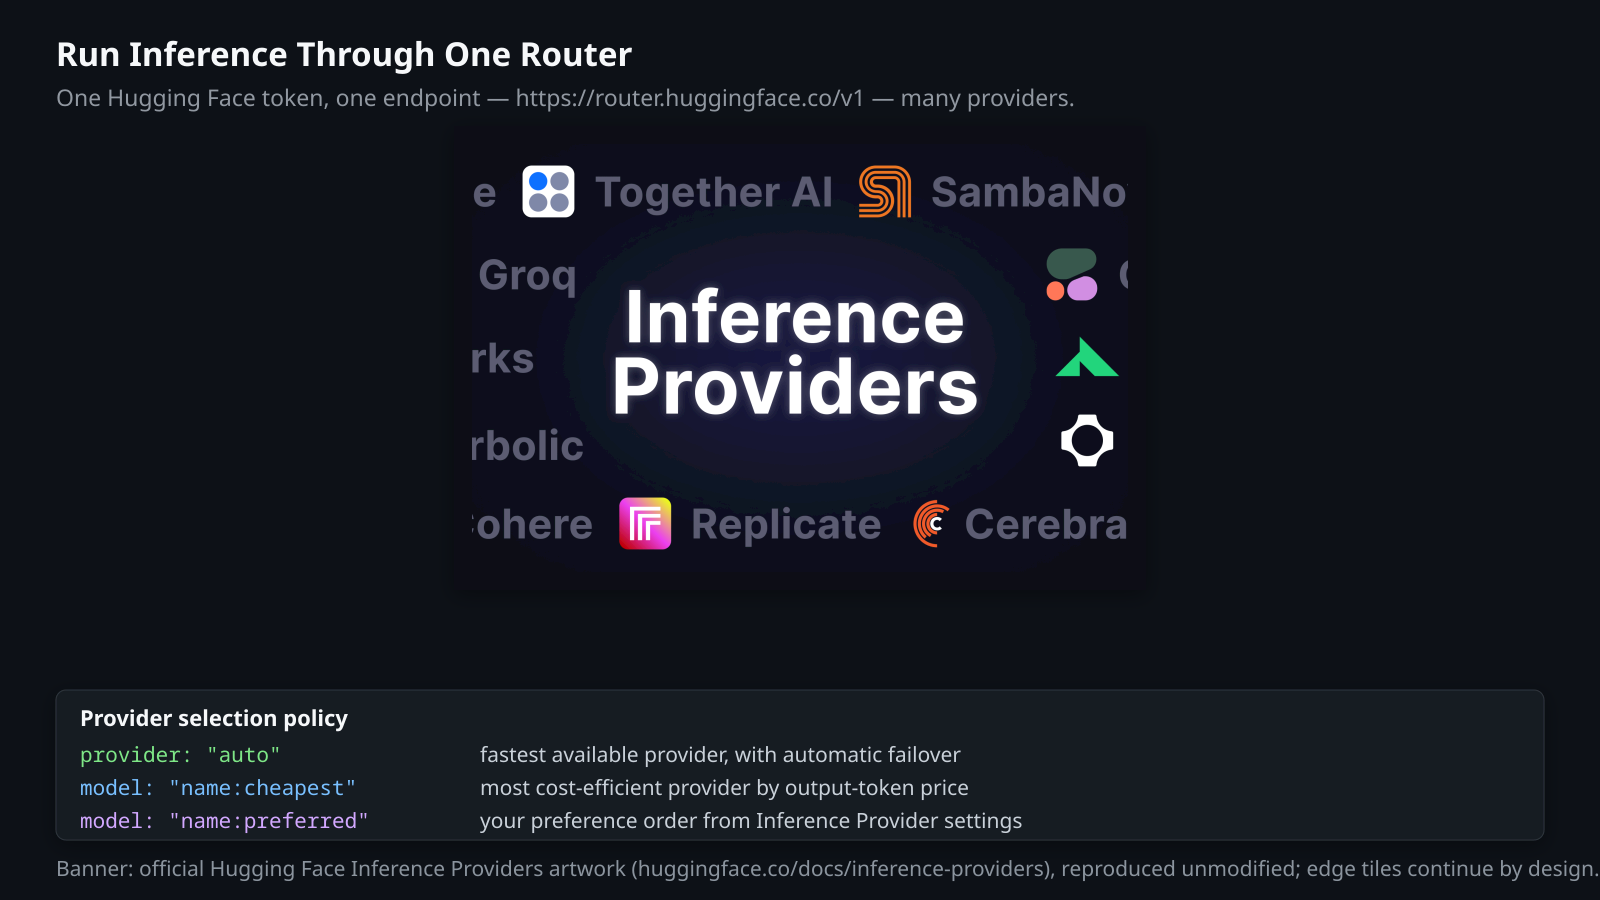
Inference Providers gives applications a unified way to reach models across multiple upstream providers. The inference half of how to use Hugging Face runs through a proxy layer with unified authentication and billing through one Hub token, plus automatic failover when provider="auto" is in use and the primary provider is flagged as unavailable. If you’d rather skip the router and run the model on your own hardware, see how to run local LLMs on your own hardware.
The Hub offers several ways to try the system:
- Interactive widgets on model pages.
- The Inference Playground for testing and comparing chat-completion models.
- The Python and JavaScript inference clients.
- The OpenAI-compatible router for chat-completion applications.
For a broader look at the closest consumer-product surface that also uses the same chat-completion pattern, see how to use ChatGPT starter guide.
Code access requires a Hugging Face token with inference permissions, created at Settings > Tokens. That’s a different reason to create a token from pushing a repository, so check the permission instead of assuming every token has the same job.
Provider selection has a few useful policies:
provider="auto"is the default and selects the fastest available provider, the same policy as:fastest.- A named provider forces the request through that provider.
:cheapestselects the most cost-efficient provider.:preferredfollows the preference order set in Inference Provider settings.
The OpenAI-compatible endpoint is https://router.huggingface.co/v1. Point an OpenAI client at that base URL, use a Hugging Face token, and call a chat-completion model through the normal client shape.
That compatibility layer currently covers chat-completion tasks. For text-to-image, embeddings, speech processing, and other task types, use the Hugging Face inference clients instead.
Inference uses pay-as-you-go pricing with monthly included credits. The August 2026 source pages list $0.10 per month for free users, $2.00 for PRO users, and $2.00 per seat for Team or Enterprise organizations. Pay-as-you-go billing applies after those credits are used. Re-check these numbers at publication time.
A Practical Checklist
Use this order for a first project. It’s the shortest practical path for how to use Hugging Face without turning setup into its own project:
- Create the account. Start free. Check the current plan requirements if the project needs a compute-backed Gradio or Docker Space.
- Create the token. Use
writepermission for repository creation and uploads. Use inference permissions for provider-backed model calls. - Install the client. Install
huggingface_hub, then runhf auth loginor provideHF_TOKENthrough the environment where the code runs. - Create the repository. Choose the repository and visibility before uploading the artifact.
- Upload the first file. Use the web UI, a library
push_to_hubmethod, or the Git workflow that matches the project. - Build the demo if you need one. Choose Static for a static page, Gradio for an interactive demo, or Docker for a custom container.
- Add inference if the app needs it. Use
InferenceClientor the OpenAI-compatible router athttps://router.huggingface.co/v1, with a token that has inference permissions.
The useful part of this sequence is the repeated structure: repository, file, commit, visibility, token, client. Models, datasets, Spaces, and inference expose those pieces in different ways, but the operating questions stay the same.
Frequently Asked Questions
Do I need to pay to use Hugging Face?
You can start with a free account. For most readers asking how to use Hugging Face, a paid plan becomes relevant when you need compute-backed Gradio or Docker Spaces, higher storage or limits, protected Spaces, or the other features listed on the current PRO, Team, and Enterprise pages. Pricing and included credits are volatile, so check the official pages before making a plan decision.
What’s the difference between hf auth login and HF_TOKEN?
hf auth login is interactive. It uses a browser and short code, then saves the token in the local Hugging Face cache. HF_TOKEN is an environment variable that takes priority over the cached token. It’s the cleaner fit for a Space or another environment where the credential should come from a secret.
Can I use Hugging Face models with the OpenAI Python client?
Yes, for chat-completion tasks. Point the client’s base URL at https://router.huggingface.co/v1 and authenticate with a Hugging Face token that has inference permissions. Use the Hugging Face inference clients for text-to-image, embeddings, speech processing, and other tasks outside that endpoint’s current scope.
Where does my Space’s data live?
The default local disk is ephemeral, so data can disappear when the Space restarts or stops. Attach a Storage Bucket when the app needs persistent files. Models, datasets, and other Spaces can also be mounted as read-only repository volumes.
Should I use the Python library or the hf CLI?
Use the Python library when the Hub call belongs in Python code. Use the hf CLI for terminal work. Raw Git makes sense when you need repository-level version control. All three paths work against the same Hub primitives.
Where to Go From Here
Knowing how to use Hugging Face isn’t about memorizing every product page. It’s the same loop in several places: choose the repository, set visibility, pick the upload path, authenticate with the right permission, and choose the runtime.
Start with one real artifact. Upload a small model or dataset, load a public dataset with load_dataset("namespace/name"), or deploy a small Gradio Space. Then use a different part of the same system. The vocabulary gets easier once the repository and token model stops being abstract.
Reviewed & written by
Tony Simons
Tony has a bachelor's degree from the University of Phoenix and over 14 years of writing experience between multiple publications in the tech, photography, lifestyle, and deal industries.


