AI & Software · Tutorial
How to Convert and Resize Images With Preview on Mac
Convert an image to JPEG or PNG, resize a copy in Preview, and check it before sharing.
 By Tony Simons 4 min read
Disclosure: We may earn a commission when you shop through the links below. It never changes the verdict. Details
Disclosure
We may earn a commission when you shop through the links below. Opinions stay independent. Full disclosure
Someone asks for a JPEG, but your image is a PNG. Or a website wants a smaller image and the file you have is enormous. You don’t need to install another image editor just to make a usable copy: Preview can convert and resize images right on your Mac.
Quick answer: Open the image in Preview, choose File → Export, select a format such as JPEG or PNG, give the new file a different name or location, and save it. To change dimensions, work on a duplicate and choose Tools → Adjust Size. Check the finished copy before sharing.
This guide follows Apple’s image conversion and resizing instructions, checked November 1, 2026. For this article, a disposable sample PNG was exported as JPEG in Preview and the resulting file type was verified. The resize controls were inspected but a resize was not completed; menus may vary with macOS.
Featured image: AI-generated conceptual illustration, not an image of Preview.
Choose the format for the job
JPEG is useful when a form or recipient asks for a common photo format. Preview offers a quality slider when exporting JPEG. Lower quality may reduce file size but can also introduce visible compression; check the result instead of assuming it will be good enough.
PNG is useful for graphics that need transparency, such as a cutout or logo. JPEG doesn’t support transparent pixels, so don’t expect a transparent background to survive conversion to JPEG. Keep the original PNG if transparency matters.
Changing the extension in a filename isn’t the same thing as converting the file. Use Export so Preview creates the selected format.
Convert the image and keep the original
- Open the image in Preview. Start with a copy if the file is important.
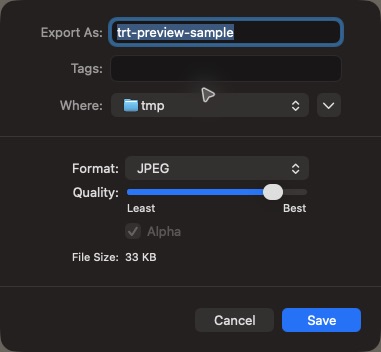
- Choose File → Export. In the export dialog, open Format and choose the type you need, such as JPEG or PNG.
- If you choose JPEG, adjust Quality if needed. The dialog can show an estimated file size; it won’t tell you whether the image looks good enough for your use.
- Give the exported copy a distinct name or choose a different folder, then click Save. Avoid replacing the original unless you intend to.
- Find and open the new file. Check the image, dimensions, and any transparent areas before sending it. In Finder, select the file and choose File → Get Info to inspect its kind and size.
In the tested sample, Preview’s export dialog offered JPEG and a quality slider; saving created a separate JPEG while the PNG remained in place. That confirms this sample conversion, not every file type or macOS version.
Resize a copy for a specific pixel limit
If a site asks for an image no wider than, say, 1,600 pixels, file format and dimensions are separate decisions. A JPEG can still be far too large in pixel dimensions; a small image can still be saved as PNG.
- Open the image and choose File → Duplicate so you have a separate working copy.
- Choose Tools → Adjust Size. In the dimensions dialog, choose pixels as the unit if the limit is given in pixels.
- Keep Scale proportionally selected so changing the width maintains the image’s shape. Select Resample image when changing the actual pixel dimensions.
- Enter the desired width. Check the resulting height and size estimate, then choose OK.
- Export or save the copy with a clear name, then verify the result. Keep the original in case you need the full-resolution image later.
Reducing dimensions removes image detail; making a tiny image larger won’t restore detail that wasn’t there. For critical graphics or print work, keep a high-resolution original and review the exported copy at the size it will actually be used.
When the result isn’t what you expected
- The file is still too large: Check both pixel dimensions and JPEG quality. Make incremental changes and inspect the result; the right balance depends on the image and the service’s limit.
- The background is no longer transparent: JPEG doesn’t preserve transparency. Go back to the original and export as PNG if the destination accepts it.
- I can’t find the new file: Reopen Export and check the folder shown next to Where; search Finder for the name you chose.
- The picture looks stretched: Return to the original copy, open Adjust Size, and make sure Scale proportionally is selected.
- The destination rejects the file: Check its accepted formats, pixel dimensions, and file-size limit. A filename ending in .jpg doesn’t prove the contents are a JPEG.
Make a copy, export it, and open the result before you share. That small check beats finding out the upload failed after you’ve already closed the window. For another Mac workflow, see how to record your screen with sound.
The Inner Circle
One AI shortcut a week. Tested first.
The tools and tricks I actually kept using, sent once a week. Skip the hype threads.
- New verdicts and scores
- Same-day workflow tips
- No spam, unsubscribe anytime
Written by
Tony Simons
Tony has a bachelor's degree from the University of Phoenix and over 14 years of writing experience between multiple publications in the tech, photography, lifestyle, and deal industries.