
AI & Software · Tutorial
How to Use ComfyUI: A Practical First-Day Guide to Node-Based Image Generation
ComfyUI is the open-source node-based interface for running image and video generation models locally. This guide walks you through your first install, first text-to-image, first image-to-image, and the first custom node install, all grounded in the live ComfyUI documentation.
 By Tony Simons 11 min read
Disclosure: This page may contain affiliate links; I may earn a commission at no extra cost to you. It never changes the verdict. Details

Disclosure
I may earn a commission from qualifying purchases. Opinions stay independent. Full disclosure
ComfyUI is the open-source node-based interface for running Stable Diffusion and friends on your own hardware. If you’re learning how to use ComfyUI after bouncing off Automatic1111 because the UI felt like a settings dump, or off web generators because they capped what you could chain, ComfyUI is the version of this that finally clicked for me.
You drag boxes around, connect them with lines, and the same workflow you just built runs again tomorrow, or in someone else’s install, or inside a bigger graph you build later.
This guide is for someone who has never opened ComfyUI before. By the end you should have a working install, a successful first text-to-image generation, a working image-to-image workflow, and one custom node installed through ComfyUI Manager.
Everything below is grounded in ComfyUI's official documentation, accessed August 21, 2026. I read the live pages and built this from what they actually say, not from a year-old tutorial.
How to use ComfyUI: what the tool actually is
ComfyUI is an open-source application that wraps a node graph around generative AI inference. Each box on the canvas is a node that does one job: load a model, encode a text prompt, sample an image, save the output.
Each line between boxes is a typed connection carrying data from one node’s output to another node’s input. The full graph is called a workflow, and that graph is the program. The mental shift in how to use ComfyUI is realizing you build software by drawing it.
The reason that matters is reproducibility. A ComfyUI workflow can be saved as a JSON file, exported, emailed, posted on a forum, dropped into a colleague’s install, and run identically there.
The same JSON file is also embedded into every PNG ComfyUI produces, so dragging a ComfyUI-generated image back into the interface reloads the exact graph that produced it. (docs.comfy.org)
Install ComfyUI
The install step of how to use ComfyUI depends on your OS.
Windows and macOS Apple Silicon users get a standalone installer called Comfy Desktop. It runs ComfyUI in its own Python environment, tracks the stable release by default, and can be switched to “Latest on GitHub” if you want every commit. Source is on GitHub under Comfy-Org/Comfy-Desktop.
Linux has no official installer yet. You’ll be building from source.
Portable Windows builds are also available; they bundle Python 3.13 and PyTorch CUDA 13.0 and always use the latest commits.
Python version. Use Python 3.13 if you can. Python 3.12 is a safe fallback when a custom node dependency doesn’t like 3.13 yet. Python 3.14 technically works but some custom nodes still have issues with it. (docs.comfy.org)
Browser. Use Google Chrome 143 or later. Earlier versions have known visual glitches and performance problems in the ComfyUI canvas.
Hardware. ComfyUI supports a wide range of accelerators. NVIDIA GPUs use stable PyTorch with CUDA 13.0. AMD GPUs on Linux use ROCm 7.2, with experimental Windows support for RX 7000 series, Strix Halo, and RX 9000 series.
Intel Arc GPUs use native PyTorch torch.xpu. Apple Silicon M1/M2/M3/M4 Macs use PyTorch’s MPS backend. Ascend NPU uses torch_npu, Cambricon MLU uses torch_mlu, and an Iluvatar Corex extension exists. If you have nothing else, the --cpu flag works, just slowly.
Apple Silicon specifically. ComfyUI doesn’t use MLX. It uses PyTorch with Metal Performance Shaders. You can verify MPS is wired up with:
python -c "import torch; print(torch.backends.mps.is_available())"A True response means you’re running on the GPU. (docs.comfy.org)
Docker. ComfyUI doesn’t publish an official Docker image. Community-maintained images exist on Docker Hub but are unsupported by the team.
Load your first workflow and generate an image
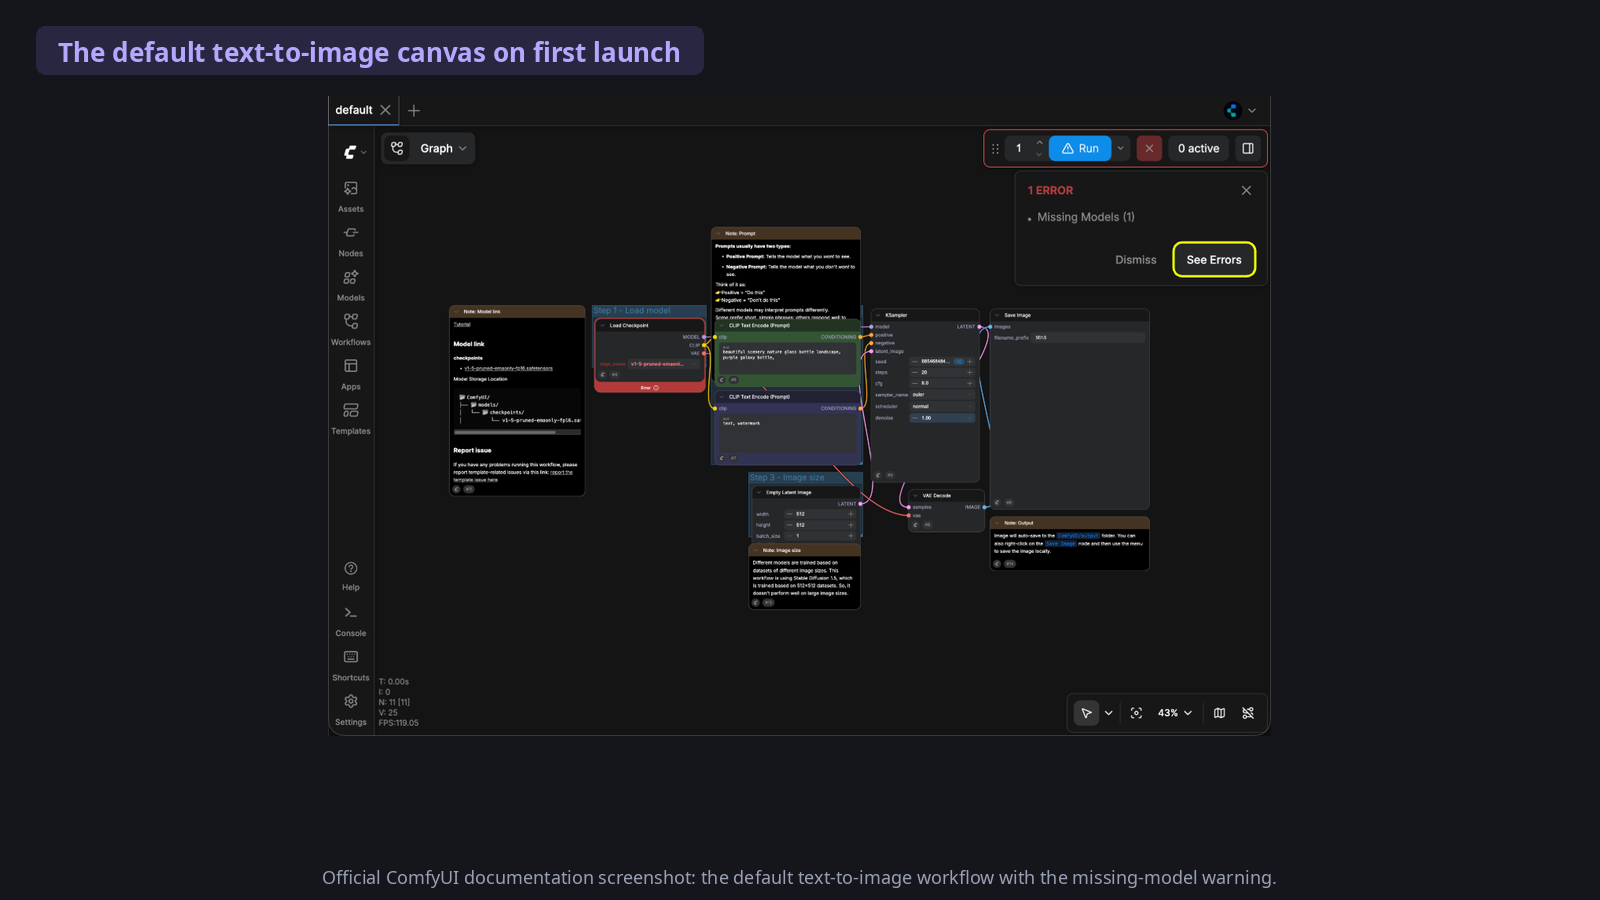
The fastest way to learn how to use ComfyUI is to load a workflow and make something with it, so that’s where the walkthrough starts.
When ComfyUI launches, it usually loads a default text-to-image workflow automatically. If it doesn’t, or you want to try other ways to load workflows, here are the three the docs list.
- Let ComfyUI load the default workflow on launch.
- Drag a ComfyUI-generated image into the interface. Any image ComfyUI produced carries the workflow JSON in its metadata, and dropping it back in reloads the graph.
- Use the Workflows → Open menu to open an image or a workflow.json file you downloaded from somewhere. (docs.comfy.org)
After loading the workflow, the second thing ComfyUI does is check for missing models. If you’re learning how to use ComfyUI, expect the first detour right here: most installs don’t ship with a base model, and ComfyUI tells you what’s missing.
You’ll see a warning dialog listing the files the workflow expects. Click the warning to see exactly which model is missing and a direct download link.
Models live under <your ComfyUI installation>/ComfyUI/models/, sorted into subfolders by type: checkpoints, embeddings, vae, lora, upscale_model, and others. On Comfy Desktop the path is slightly different; the Help → Open folder → Open models folder menu opens the right one for your install.
For your first run, the docs walk through v1-5-pruned-emaonly-fp16.safetensors from the Comfy-Org/stable-diffusion-v1-5-archive Hugging Face repo. Drop that file into ComfyUI/models/checkpoints and you have a working base. If the Hub itself is new to you, the Hugging Face starter guide covers that side of the stack.
To actually generate, click Run on the workflow or press Ctrl+Enter (Cmd+Enter on macOS). On a modern GPU, the first image usually appears in under a minute.
Understand the canvas: nodes, links, and modes
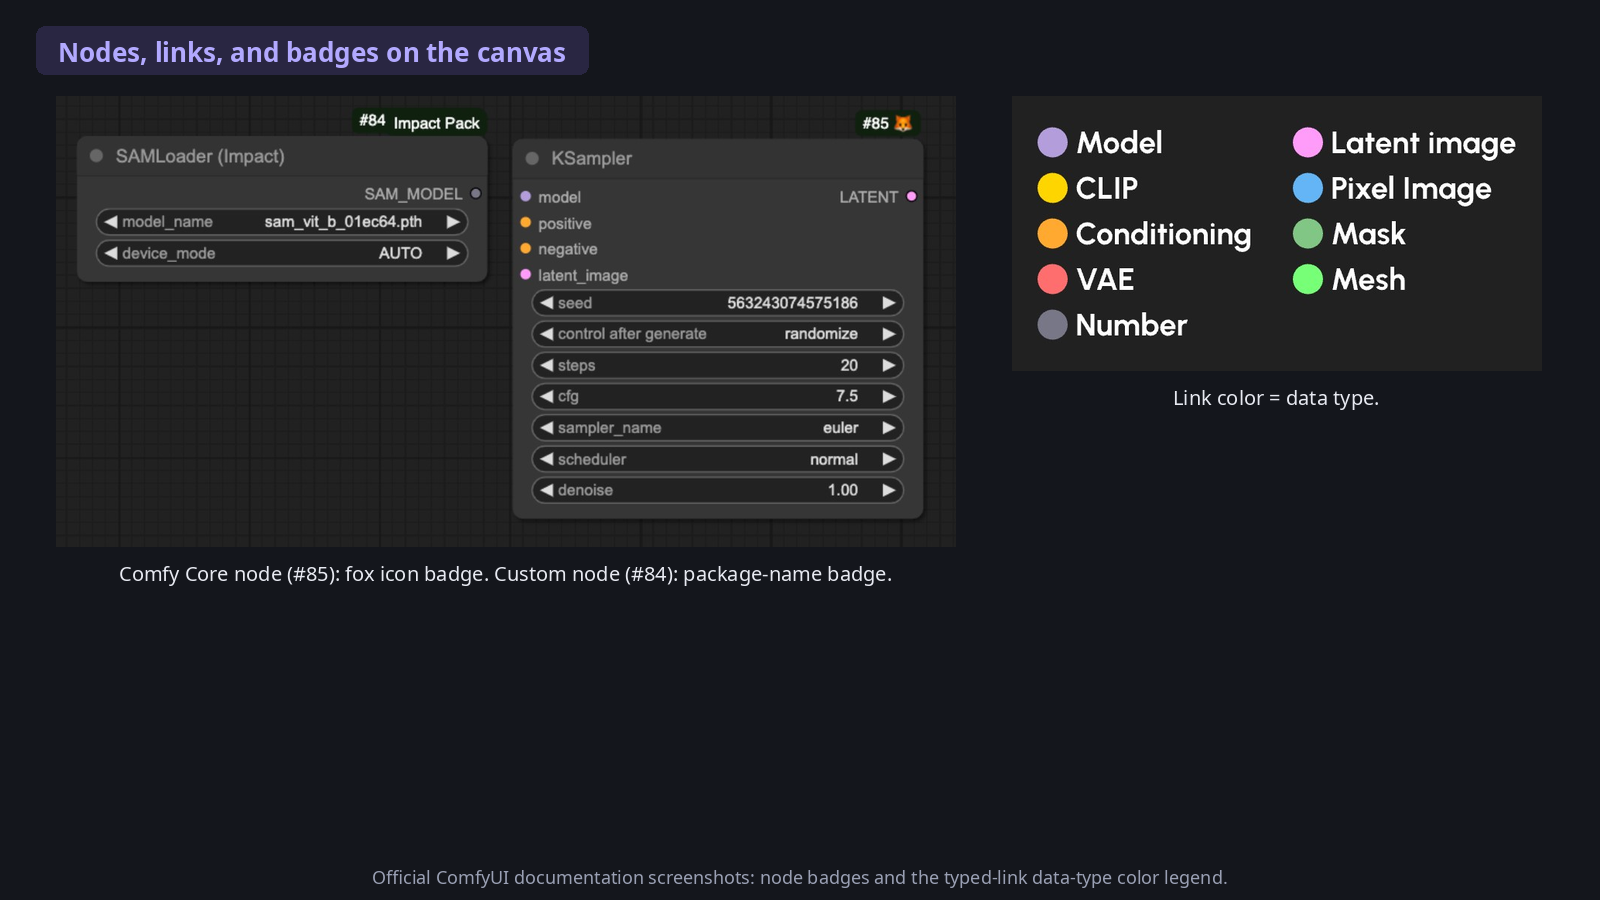
A ComfyUI workflow has three layers worth knowing about on day one: nodes, links, and modes. Most of how to use ComfyUI day to day is reading what the canvas is telling you.
Nodes are the boxes. Each node is a function operator: it takes typed input, does work on it, and emits typed output.
Nodes come in two flavors. Comfy Core nodes ship with ComfyUI itself, marked with a fox icon in the canvas. Custom Nodes are community packages installed under ComfyUI/custom_nodes and listed at registry.comfy.org, and they show their package name as a badge. (docs.comfy.org)
Links are the lines. They connect a node’s output to a node’s input, and only compatible data types can connect. ComfyUI color-codes them by data type:
- Diffusion model: lavender
- CLIP model: yellow
- VAE model: rose
- Conditioning: orange
- Latent image: pink
- Pixel image: blue
- Mask: green
- Number: light green
- Mesh: bright green
If you try to connect a pixel image to an input that expects a number, the link simply won’t form. That color check is your friend; it’s the canvas telling you a connection would be meaningless.
Nodes also have states. A normal node is idle and ready. A running node is currently executing. An error node is marked red on the bad input, so the fix is usually on the input that’s red, not on the node itself. A missing node means either Comfy Core is out of date or a custom node the workflow references isn’t installed locally.
Modes control whether a node executes. Three of them matter.
- Always runs the node every time the workflow starts or any of its inputs change.
- Never runs nothing and breaks downstream nodes that depend on this one’s data.
- Bypass skips execution while still passing unprocessed data through to downstream nodes.
If you have two Load LoRA nodes stacked on the same model and want to A/B them, set one to Never and one to Bypass. With Never, downstream nodes error out because nothing comes out the other end. With Bypass, the second Load LoRA is invisible and downstream sees the first one’s output. That contrast is the entire point of Bypass.
Save and share a workflow
You have two options, and you usually want both. Saving and sharing workflows is the part of how to use ComfyUI that compounds: every graph you save is reusable by future you and by everyone else.
Save the workflow as a JSON file via Workflows → Export. This is the version you email to a friend, post on a forum, or commit to a repo.
Or, more importantly, every image ComfyUI produces carries the workflow JSON inside its metadata. Drag a ComfyUI PNG back into the canvas and the graph reloads. This is the “magic” that makes ComfyUI portable: every output is also a workflow you can run, edit, and remix.
Customize with templates and custom nodes
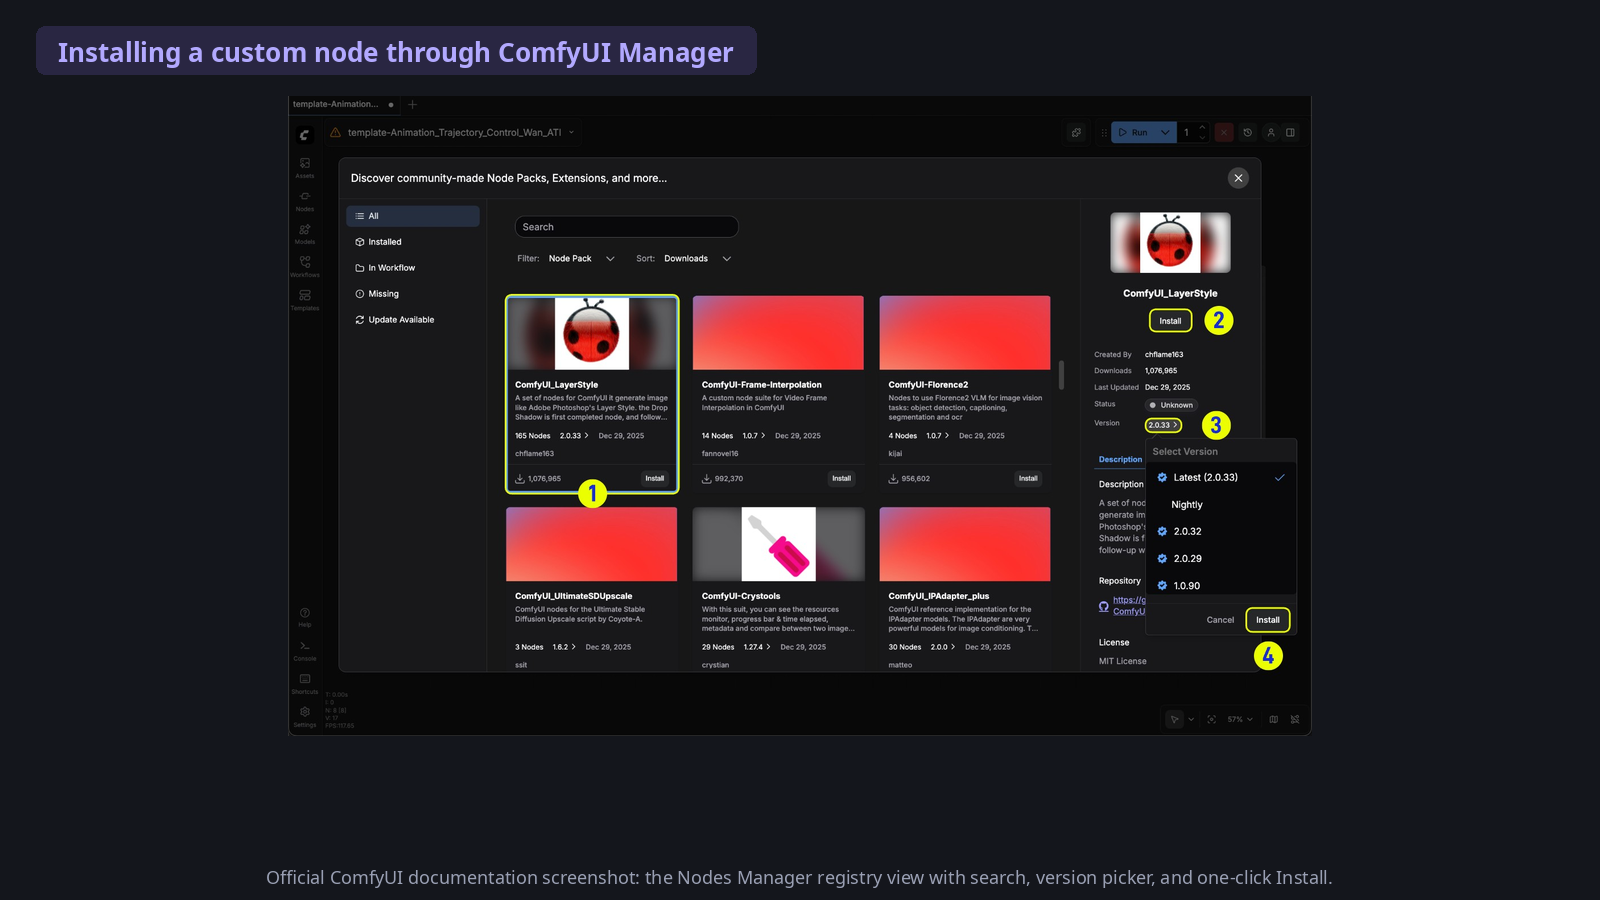
You don’t have to build every workflow from scratch. ComfyUI ships built-in templates reachable from Workflow → Browse Workflow Templates. They use only Comfy Core nodes and prompt you to download any required models the first time you run one. They’re the fastest way to see how a real workflow is laid out before you start composing your own.
When Comfy Core isn’t enough, you install a custom node. The custom-node step of how to use ComfyUI is where the tool stops being a demo.
The docs are explicit that installing a custom node is always a two-step process: clone or unzip the code into ComfyUI/custom_nodes, then install its required Python dependencies. The recommended way to do both at once is ComfyUI Manager. (docs.comfy.org)
ComfyUI Manager is itself a custom node, and it adds five things to your install: a GUI for searching the registry, automated dependency handling, the ability to update or disable installed nodes, missing-node detection when you load a workflow, and snapshot management so you can save and restore an entire install state.
To install Manager on a fresh ComfyUI Desktop install, it’s usually already enabled. On portable or manual installs, follow the ComfyUI Manager installation guide.
After Manager is in place, browse the registry inside ComfyUI, click install on a package, and Manager handles the clone and the Python dependencies in one step. If a workflow references a custom node you don’t have, Manager can detect the missing node and prompt you to install it.
The docs are also direct about safety. Custom nodes run Python on your machine, and ComfyUI is open source so anyone can publish a node. Only install from authors and packages the community has used heavily. Read what the node actually does before installing it. Skip obscure or unverified packages. (docs.comfy.org)
Run image-to-image
Text-to-image is the hello world of how to use ComfyUI. Image-to-image is the day-two skill you’ll actually use, because most real work is “keep this composition, change this style.”
The setup mirrors text-to-image: load a checkpoint into ComfyUI/models/checkpoints, load the image-to-image workflow template, upload a reference image into the Load Image node, click Queue or press Ctrl/Cmd + Enter.
The single knob that matters is denoise on the KSampler node. Set denoise low (closer to 0) and the output preserves the structure of the input image closely.
Set it high (closer to 1) and the output diverges toward noise. At 1 the latent space becomes fully random and the input image no longer matters; you’re back in text-to-image territory. (docs.comfy.org)
A practical workflow: start at 0.4 for “I want my photo to look like a watercolor,” move to 0.6 for “I want it to look like a Studio Ghibli version of my photo,” and try 0.8 only when you want the input image to be a strong hint rather than a binding reference.
Where to go next
Day one of how to use ComfyUI is install, first generation, image-to-image, one custom node. Day two is where ComfyUI actually earns its reputation.
- Subgraphs. Select a group of nodes, collapse them into a reusable subgraph, and treat them like a single node. Useful when the same “load model + encode prompt + sample” trio shows up in every workflow you build.
- Snapshots. ComfyUI Manager can save your full install state (every custom node, every model reference, every setting) and restore it. Use it before any big change.
- Cloud. If you want to run ComfyUI without local hardware, Comfy Cloud hosts the same engine. It includes MCP and a CLI (
comfy generate) for running workflows from a terminal or from an AI agent. - Custom node APIs. If you want to write your own nodes, the custom node development docs cover both server-side Python and client-side JavaScript. There are starter templates and a Claude Code skill bundle if you want AI assistance writing them.
Stable Diffusion on your own GPU is the image half of a local-first AI stack. If you want the text-model half, how to run local LLMs on your own hardware is the companion guide.
What to take away
ComfyUI isn’t the easiest tool to learn on day one. The honest version of how to use ComfyUI: the node metaphor takes an afternoon to internalize, and the first missing-model warning feels like a bug when it isn’t.
Once you have a few workflows saved as JSON, you stop rebuilding from scratch. Once you have one custom node that automates the boring part of your pipeline, you stop thinking about it as “an image generator” and start thinking about it as a programmable image factory.
The short version of how to use ComfyUI: start with the default workflow, get an image out the door, swap in image-to-image, install Manager, and add one custom node you actually need. That sequence is what the docs walk through, and it’s the fastest path to ComfyUI being useful rather than just interesting.
Reviewed & written by
Tony Simons
Tony has a bachelor's degree from the University of Phoenix and over 14 years of writing experience between multiple publications in the tech, photography, lifestyle, and deal industries.


